Tuesday, 17 December 2013

Double Hot Chocolate DIY!


I. Hate. Chocolate. 

I hate it. I hate its dark, creamy first bite all the way to its bitter aftertaste. I dislike chocolate bars, chocolate cake, chocolate ice cream and, of course, hot chocolate. I rue the day when I take into a bite of what, I believe, is a moist, homemade, oatmeal raisin cookie only to find that someone has decided to riddle it with chocolate chips. Bleh! 

However, I realize that I am all alone in my dislike of chocolate and that most people agree that it is a divine gift sent from heaven. Although I personally believe that these people are insane, I am not against making other people happy, especially at Christmastime. As a result, I have included this baneful desert recipe, the Double Hot Chocolate, to this list of Christmas DIYs. To those about to make the mistake of making it for me this year: USE WHITE CHOCOLATE!!

Here is the recipe:

Ingredients: 

1/2 cup unsweetened cocoa powder
1/4 cup white sugar
1/2 cup chocolate chips
1 cinnamon stick
1 16 ounce mason jar with lid

To make:

1. In a small mason jar, layer to cocoa powder, white sugar, chocolate chips and top with a cinnamon stick. Alternatively, you can use the cinnamon stick as part of your decorations.

To serve: 

1. Place the contents of the jar in a small saucepan with 8 cups of milk. Simmer until all of the chocolate is melted and the hot chocolate is smooth. Top with marshmallows and whipped cream! Add chocolate shavings for extra deliciousness!


Thursday, 12 December 2013

DIY Christmas Ornaments!


Hello everyone!

Most of my friends and family know me as the Christmas queen. Far before the first snowfall (ok, on November 12th) I usually have my Christmas tree set up and decorated with my favourite ornaments. To me, Christmas ornaments are so much more than trivial trinkets; each one tells a story and speaks to a time in my life, much like a charm on a beautiful charm bracelet. 

That being said, my Christmas tree is somewhat crowded this year as it holds a collection that is at least twenty-seven years old. However, I am always ready to add that special something! Today, I decided to make my own Christmas ornaments as an easy DIY project. 

The process was so simple! I purchased clear ornaments from Walmart for three dollars and filled them with odds and ends that I found around the house, in this case I used pearl beads, some sparkly berries and some tinsel. The results are beautiful and the possibilities are endless. With one last clear ornament at my disposal, I have a very special DIY project coming soon that is sure to warm your heart.

For now, feast your eyes on just three examples of beautiful Christmas ornaments that you can make on a budget!

Anastasia 

Wednesday, 11 December 2013

Yummy Sugar Cookie Body Scrub!


Hello everyone!

Although I may be feeling merry and bright during this holiday season, my skin does NOT like the winter months. I am constantly battling dryness and am always on the look out for natural, hypoallergenic beauty options that won't irritate my sensitive skin.

Today I happened upon a recipe for homemade body scrub and thought that I would try it out myself. The ingredients list was so short and it was so easy to make that I almost thought it was too good to be true. It wasn't! It is amazing!

Of course, I also had to add my own holiday twist to the mix and the result is my new favourite beauty product: delicious smelling sugar cookie body scrub! After testing it in the shower, I was hooked and am already on my second batch! I hope that you like it as much as I do! Here is how to make this wonderful holiday concoction: 

Step 1: What You Need


Seriously, that is ALL you need!


Step 2: Mix!

Add the white sugar and brown sugar to separate bowls. Then, add half of the coconut oil to the white sugar and the other half into the brown sugar. Add four drops of sugar cookie scented oil to each bowl. If you can't find sugar cookie oil, simply add two drops of almond oil and a little vanilla into each bowl. Mix well.


Step 3: Layer.

Layer each type of sugar on top of each other in a jar. The white sugar acts as a fine body scrub whereas the brown sugar is more coarse. I use both and LOVE them! Add some festive trimmings, a tag and (ta da!) you have made a delicious smelling holiday body scrub!!


I hope you enjoy this recipe! For more holiday tips and tricks, stay tuned! Also, be sure to follow me on Twitter (@HauteOttawa) and Pinterest (Some Like It Haute) to see more of my favourite holiday DIYS! 

Anastasia 

Monday, 9 December 2013

Prize Shortbread Recipe!


I LOVE COOKIES. 

No, really. I have an obsession. I have never met a cookie that I didn't like and try to consume them as often as I can. During the holiday season, I like to bake (and eat) my favourite cookies of all: my Mom's prize shortbreads! Deliciously buttery, these shortbreads have been a part of my life since childhood and I hope to pass this recipe on to my own kids some day.  

Of course, if you can manage not eating them all yourself, these Christmas cookies also make for a thoughtful and inexpensive gift for friends and family. Simply bake the cookies and store in a seasonal tin!

Here is the recipe. Enjoy! 


Step 1: Cream the butter.

Using beaters or a large, wooden spoon, cream the butter until it is silky. 

Step 2: Add ingredients.  

Stir in icing sugar, salt, nutmeg and egg yolk. Keep the egg white for decorating. The mixture should look like this: 


 Step 3: Add flour. 

Add flour to your mixture, a little at a time. Roll dough into a ball and chill for 1 hour.


Step 4: Roll dough.

Roll dough out onto a floured surface using a rolling pin. Use cookie cutters to create holiday shapes!


Step 5: Bake.

Arrage cookies an inch apart on an ungreased cookie sheet. Bake at 350° for seven to ten minutes.

Step 6: Decorate!

Let the cookies cool for ten minutes. Then, decorate your shortbread cookies. Simply brush the cookies with the leftover egg yolk and sprinkle coloured sugar onto them! Store the shortbreads in a pretty holiday tin or freeze them in freezer safe ziplock bags. Share them with friends and family...or eat them all yourself!


Thursday, 5 December 2013

DIY Tinsel Wrapped Christmas Trees!


The Christmas tree has long been an icon of the holiday season. Always eager to add a little sparkle to my home décor, I love the idea of emulating the classic Christmas tree shape with some of the beautiful and twinkly things that I find around the house at this time of year. 

Introducing the most inexpensive DIY holiday project yet: the tinsel wrapped Christmas tree. Make this holiday décor item yourself and add it to mantles, side tables or anywhere else you would like to add some Christmas cheer!

Step 1:


Use some sparkly Christmas decorations that you have around the house!


Step 2: 

Take your cardboard cereal box and fold it into a cone shape (to resemble a tree). Secure the seams with tape. Cut any excess cardboard off of the bottom of the cone so that it stands flat.


Step 3: 

Using a glue gun and some tinsel, wrap the tinsel around the cardboard cone from the bottom to the top. In this case, I ran out of the same colour of tinsel, but I decided that I really liked the two tone effect. You should have what appears to be a fuzzy looking tree. 


Step 4:

To create more of a Christmas tree shape, and mimic the look of a garland, wrap Christmas beads from the base of the tree to the top just as you did the tinsel. Secure with hot glue.


Ta da! A DIY Christmas tree that is inexpensive and rivals the ones you can buy at the mall! To make yours extraordinary, add baubles, ribbon and a star! The possibilities are endless. 

Stay tuned for more DIY projects, home décor and fashion ideas coming your way this blogmas!

Anastasia


Wednesday, 4 December 2013

DIY Holiday Wreath


Holiday wreaths are a great way to add a warm and inviting touch to your home. You can purchase a high quality holiday wreath but it will cost you a pretty penny. Keep the pretty and your pennies by making your own wreath at home by following these easy steps!

You Will Need:


Step 1: 

Glue your greenery onto the wreath form. I had greenery from an old wreath that bit the dust. Simply place the greenery onto the form until it looks like the real thing! Don't worry if there are some spots that are less thick than others, those will be covered up in just a moment!


Step 2: 

Add the twinkle lights by wrapping them around the wreath and tying the cords onto the wreath form with wire or dental floss. Make sure that the end of the cord has enough slack so that you can plug your wreath in when you are finished. 

Step 3: 

Add some sparkle! I found some broken Christmas bulbs and some plastic snowflakes lying around my house and hot glued them right into the greenery. For the ornaments, simply pop off the metal hook and closure and add hot glue onto the hole in the bulb. I then added a big, red ribbon bow to the bottom of the wreath. Easy!


Step 4:

Hang your wreath using wire or dental floss. Sit back and enjoy!


Tuesday, 3 December 2013

Merry Blogmas!!


Hello everybody!

With the holiday season upon us, I thought that I would hop on the Blogmas and Vlogmas bandwagon and get crafting! 

For those of you who are not familiar with Blog/Vlogmas, it just happens to be the most exciting time of the year. For each day leading up to January 1st, I will be sharing a holiday themed DIY here on my blog and on my vlog that is easy, inexpensive and "trés haute"! 

I hope you will follow along with me as I add some holiday cheer to our home this year! And remember, if you try any of these DIY projects, feel free to share your results by tagging your pictures and posts with #hauteblogmas!

Happy holidays and merry b/vlogmas!

Anastasia 

Tuesday, 15 October 2013

Viva Italia! A Trip To Allegro Ristorante


In a past life, I am certain that I was Italian. My appreciation for sweet wine, ripe tomatoes, garlic, cheeses and strong herbs cause me to question my own heritage as a Polish Canadian and have me lingering at many of the storefronts and restaurants in Ottawa's Italian district. 


Yours Truly, at Allegro Ristorante.

In my quest to find the perfect Italian restaurant serving up the freshest of Italian ingredients, I came upon the beautifully staged Allegro Ristorante. Located on Preston Street in the heart of Little Italy, Allegro Ristorante lives up to it's slogan as being the "Finest of Italian Cuisine". I had the privilege of sitting down at the newly renovated venue while indulging on Allgro's most requested Italian fare. I was not disappointed. 


Allegro Ristorante, Ottawa, Ontario.


Allegro Ristorante has long been listed as one of Ottawa's top Italian food destinations for the past nineteen years. Patrons have come to know the restaurant's unique approach to serving up mouth-watering Italian fare, one that is centred upon the traditional, takes its time and delivers impeccable results. 

A year and four months ago, owner Steven Clyne made it his mission to take Allegro Ristorante to the next level in Italian cuisine. Eager to create the type of ambiance and warmth that is synonymous with the Italian culture, Mr. Clyne has brought about positive changes to the restaurant's atmosphere that is much appreciated by its regular patrons. I know that I appreciated it, when I entered the front doors and was at once taken by the new architecture which plays upon the notion of being inside a wine barrel, a warm and inviting feeling that reflects the service of the restaurant.  


Steven Clyne, Owner, Allegro Ristorante.


Thankfully for me, though changes have been made, Allegro Ristorante still serves up mouth- watering Italian fare, courtesy of Jason Low, head chef. I was amazed at the pride this chef took in creating his plates; each was more delicious than the last. Below is a recount of a delicious night out.

That's Amore

We were at once greeted by a gracious and attentive host, Mme. Marie Frédérique Ouellet, whose bright smile and soothing accent made us feel comfortable and well taken care of. To fight off the chill of a crisp, fall night, we started with glasses of the sweet house Pinot Grigio Chardonnay and ordered off the antipasti caldi menu.

Calamari and Zucchini Fritti were promptly delivered with accompanying sauces. I must confess that I usually dislike fried zucchini sticks as I find most venues will saturate the vegetable in oil to the point beyond recognition and I was hesitant to subject my palette to the inevitable oil slick. However, I was pleasantly surprised at the lightness of the batter, the slight crunch of the zucchini skin and the zesty lemon and dill taste. I was shocked to find that my staff and I ate the entire platter! Scrumptious! 


Zucchini Fritti, Allegro Ristorante.

My colleague, being a self-professed connoisseur of all things calamari, delighted in the beautifully crispy overlay and the deliciously fleshy centre. Allegro was on a roll, however, we wondered if they would continue their success. 

They did. I ordered the insalata di cecare and was not disappointed. The freshness of the house-made croutons perfectly accompanied the richness of the dressing. My colleague, who had ordered the insalata mista, a house salad, marvelled at the sweetness of the red peppers that perfectly complimented the acidity of the red wine dressing. 

Our expectations, and hunger, grew as we each chose our main. I chose the Pollo Portafolio, chicken stuffed with cheese and prosciutto with fettuccini alfredo on the side and my colleague decided upon the Mignonette dello Chef, veal stuffed with ham and cheese in a black peppercorn sauce. The Pollo Portafolio was simply delicious and was visually stunning. 


Pollo Portifolio, Allegro Ristorante.

A crispy skin made way for tender chicken and melt-in-your mouth cheese. I was in heaven. The fettuccini was the perfect cook (al dente) and the alfredo sauce was rich and tasty. The tomato sauce that accompanied the chicken was fresh and sweet. My colleague marvelled at the tenderness of his veal and the thick bolognase that accompanied his side of spaghetti. After a full five minutes of deliberation and pessimistic thinking, my colleague and I could find nothing (nothing!) wrong with either of our plates. The sauces were perfectly suited and did not overpower the taste of the meat, the pasta was cooked to perfection...we were both extremely satisfied.  

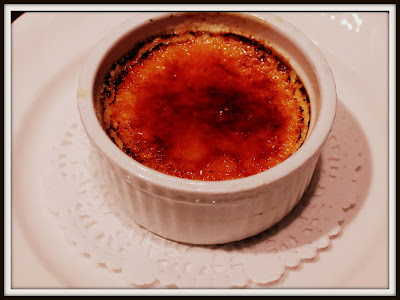
There are times when my colleague and I tend to skip dessert. Allegro, however, had served up such a feast that we couldn't possibly turn down a third round. My staff ordered the Torta al Fromaggio, a decadent, homemade Bailey's Expresso Cheese cake and I decided upon a desert that I normally dislike, the creme carmellata as a test to Allegro's ability to serve up the perfect creme brulee.

To say that the deserts were superior is an understatement. I, having disliked so many of the burnt offerings that pass themselves as creme brulee at so many restaurants, marvelled at the mouth-watering taste of the pumpkin spiced confection  A true indulgence, I devoured every last drop. The cheesecake was exquisite. Fluffy and creamy with just the right amount of sumptuous, my colleague ate the entire thing in a matter of seconds. These were the best desserts we have had in a very long time. 


Pumpkin Spice Creme Brulée, Allegro Ristorante.


Allegro Ristorante was one of the finest Italian restaurants we have visited in the Ottawa region. The food was delicious and the staff was very accommodating. It is sometimes difficult to find an Italian restaurant that succeeds in delivering the generosity and love that is so inherent to the Italian culture. However, Allegro's passion for Italian flavours and warm hospitality make it a staple in Italian cuisine. If you are like me and consider yourself a lover of all things Italian, Allegro Ristorante is for you. Now that's amore!

Restaurant Rating: * * * * * 

Anastasia


Friday, 11 October 2013

DIY Video Pumpkin Soaps!


As requested, here is an easy How-To video showing you how to make these cute Thanksgiving/Halloween soaps! Don't forget to like and subscribe to my YouTube channel, Some Like It Haute!


EASY THANKSGIVING/HALLOWEEN PUMKIN SOAPS!!


Spooky Halloween Mantlepiece!!

Check out the "Style" section (above) to see how you can recreate this indoor Halloween look!


Thursday, 3 October 2013

Home For The "Fallidays"!


There is something about crisp Autumn air that brings along an acute desire for sumptuous fall scents. Soon, I'm ready to be engulfed by them and am quick to purchase candles, plug-ins, and essential oils that have such enticing names like "warm apple pie", "cinnamon market" and "fall harvest". Soon familiar scents that warm the air, and the heart, fill my house and I have the distinct urge to put on a soft cashmere sweater, brew my favourite apple tea and cozy up with a good book. 

This fall, with the intention of splurging on my favourite fall fragrances, I wanted to find a new, unique way of infusing my home with one of my favourite scents for this time of year: "pumpkin spice". At once, I imagined a warm bubble bath, lit with candles of course, with sweet smelling pumpkin soaps. Completely adorable and fully customizable, these soaps make a wonderful addition to your fall bathroom décor and are the perfect hostess gift, perhaps after a delicious Thanksgiving dinner? 

Here are the results. Instructions on how to make these easy pumpkin soaps yourself will be featured soon on my YouTube channel, Some Like It Haute (Anastasia Marie). Now sit back, enjoy the bubbles and try not to take a bite!


Monday, 30 September 2013

Love As Luxury: Ottawa-Based FifteenFiftyOne Photography


Weddings are, by their very nature, a luxurious event. When love abounds, people feel a sense of warmth and comfort that can be as enveloping as the perfect cashmere sweater on a stormy night. Adding to this sense are the beautiful surroundings that often accompany a well-planned wedding. Twinkle lights, fine bone china and sparkling crystal set a perfect backdrop for the true star of the show, an everlasting love. 


My wedding was set for August 10th of this year and was a magical occasion. My A-type personality, along with the help of very skilled Ottawa wedding professionals, were key in order to plan a wedding that spoke to the couple's personalities, he a country boy at heart and me, a pavement centric city dweller. 

Being the highly visual person that I am, and wanting to capture every moment of the best day of my life, I naturally wanted to hire the very best photographer that Ottawa has to offer. When the search began, Nic and I knew that we were looking someone with passion, an artist. After months of pouring over portfolios, we found the most luxurious photographer for our special day.

Introducing Geneviéve Gorgette-Smyth of FifteenFiftyOne photography (www.fifteenfiftyone.ca). After reading her "about me" and checking out her blog (http://www.fifteenfiftyone.ca/blog/), I felt that we were already kindred spirits. Her motto, "Love. Changes. Everything." encapsulates everything I love about this woman, she has the ability to showcase the ways in which love changes not only ourselves, but our very surroundings. With love around, everything feels a little more special. I highly recommend this Ottawa photographer for all of life's special moments. 

More pictures to come...

Anastasia


Thursday, 5 September 2013

Some Like It Haute and Life's Little Luxuries

Welcome to Some Like It Haute!

My name is Anastasia and I am an Ottawa native with a confession to make.

Though I sport a newly minted graduate degree from a somewhat grueling master's degree program, I exhibit all of the stereotypical traits of the type of woman all educated women love to hate. 

I am guilty of being somewhat of the stereotypical blonde. I revel in the sight of a "sale" sign plastered across my favourite boutique, feel my heart race as I see the newest lipgloss shades lined up on a marble countertop and have an intense relationship with white chocolate anything. My favourite movies are "Legally Blonde", "The Princess Diaries" and "Bride Wars". You get the picture.

Lord knows I tried to fit in. I used the language, did the research and spent hard earned money on a new, more sophisticated wardrobe that was absolutely necessary (I swear, it was an investment) in order to be taken more seriously. I taught, wrote and presented my little heart out until I could feel all of the creative juices inside of me dry up. In other words, I entered my program sporting a vibrant pink top, and left wearing a whole lot of taupe. I lost myself.


This is a fashion nightmare.


Now that I am free, it is time for change. No more taupe. I have made it my mission this year to take time for myself, to rekindle my passion for the arts and culture.

So my strategy is simple: 

1. Search and locate the best beauty, fashion and home decor products Ottawa has to offer. 
2. Seize items. 
3. Test and review said items.
4. Add in a mix of diy, fitness and food.
5. Sprinkle in some comedy.
6. Create a luxurious life.

Life is about simple pleasures, those little things that make life so sweet, like coloured sprinkles on a cupcake. I want to feel the warmth of soft terry bath towels fresh out of the dryer, enjoy a hot cup on tea on the front porch while reading a great book and try out new recipes. I want to renovate and redecorate my home, be fit and get stylish. 

Life is a cupcake with sprinkles.


So come along with me as I indulge in life's little luxuries while staying true to the blonde, sparkly, rose scented woman that I am. Let's get dressed, primped, fit, styled and inspired!

After all, Some Like It Haute. 

Anastasia