Tuesday 17 December 2013

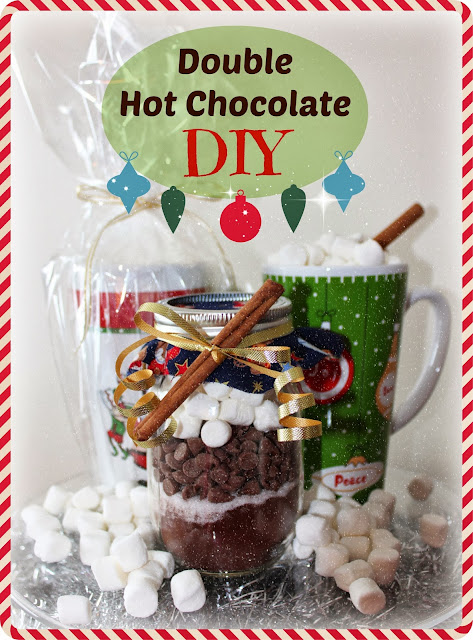
Double Hot Chocolate DIY!


I. Hate. Chocolate. 

I hate it. I hate its dark, creamy first bite all the way to its bitter aftertaste. I dislike chocolate bars, chocolate cake, chocolate ice cream and, of course, hot chocolate. I rue the day when I take into a bite of what, I believe, is a moist, homemade, oatmeal raisin cookie only to find that someone has decided to riddle it with chocolate chips. Bleh! 

However, I realize that I am all alone in my dislike of chocolate and that most people agree that it is a divine gift sent from heaven. Although I personally believe that these people are insane, I am not against making other people happy, especially at Christmastime. As a result, I have included this baneful desert recipe, the Double Hot Chocolate, to this list of Christmas DIYs. To those about to make the mistake of making it for me this year: USE WHITE CHOCOLATE!!

Here is the recipe:

Ingredients: 

1/2 cup unsweetened cocoa powder
1/4 cup white sugar
1/2 cup chocolate chips
1 cinnamon stick
1 16 ounce mason jar with lid

To make:

1. In a small mason jar, layer to cocoa powder, white sugar, chocolate chips and top with a cinnamon stick. Alternatively, you can use the cinnamon stick as part of your decorations.

To serve: 

1. Place the contents of the jar in a small saucepan with 8 cups of milk. Simmer until all of the chocolate is melted and the hot chocolate is smooth. Top with marshmallows and whipped cream! Add chocolate shavings for extra deliciousness!


Thursday 12 December 2013

DIY Christmas Ornaments!


Hello everyone!

Most of my friends and family know me as the Christmas queen. Far before the first snowfall (ok, on November 12th) I usually have my Christmas tree set up and decorated with my favourite ornaments. To me, Christmas ornaments are so much more than trivial trinkets; each one tells a story and speaks to a time in my life, much like a charm on a beautiful charm bracelet. 

That being said, my Christmas tree is somewhat crowded this year as it holds a collection that is at least twenty-seven years old. However, I am always ready to add that special something! Today, I decided to make my own Christmas ornaments as an easy DIY project. 

The process was so simple! I purchased clear ornaments from Walmart for three dollars and filled them with odds and ends that I found around the house, in this case I used pearl beads, some sparkly berries and some tinsel. The results are beautiful and the possibilities are endless. With one last clear ornament at my disposal, I have a very special DIY project coming soon that is sure to warm your heart.

For now, feast your eyes on just three examples of beautiful Christmas ornaments that you can make on a budget!

Anastasia 

Wednesday 11 December 2013

Yummy Sugar Cookie Body Scrub!


Hello everyone!

Although I may be feeling merry and bright during this holiday season, my skin does NOT like the winter months. I am constantly battling dryness and am always on the look out for natural, hypoallergenic beauty options that won't irritate my sensitive skin.

Today I happened upon a recipe for homemade body scrub and thought that I would try it out myself. The ingredients list was so short and it was so easy to make that I almost thought it was too good to be true. It wasn't! It is amazing!

Of course, I also had to add my own holiday twist to the mix and the result is my new favourite beauty product: delicious smelling sugar cookie body scrub! After testing it in the shower, I was hooked and am already on my second batch! I hope that you like it as much as I do! Here is how to make this wonderful holiday concoction: 

Step 1: What You Need


Seriously, that is ALL you need!


Step 2: Mix!

Add the white sugar and brown sugar to separate bowls. Then, add half of the coconut oil to the white sugar and the other half into the brown sugar. Add four drops of sugar cookie scented oil to each bowl. If you can't find sugar cookie oil, simply add two drops of almond oil and a little vanilla into each bowl. Mix well.


Step 3: Layer.

Layer each type of sugar on top of each other in a jar. The white sugar acts as a fine body scrub whereas the brown sugar is more coarse. I use both and LOVE them! Add some festive trimmings, a tag and (ta da!) you have made a delicious smelling holiday body scrub!!


I hope you enjoy this recipe! For more holiday tips and tricks, stay tuned! Also, be sure to follow me on Twitter (@HauteOttawa) and Pinterest (Some Like It Haute) to see more of my favourite holiday DIYS! 

Anastasia 

Monday 9 December 2013

Prize Shortbread Recipe!


I LOVE COOKIES. 

No, really. I have an obsession. I have never met a cookie that I didn't like and try to consume them as often as I can. During the holiday season, I like to bake (and eat) my favourite cookies of all: my Mom's prize shortbreads! Deliciously buttery, these shortbreads have been a part of my life since childhood and I hope to pass this recipe on to my own kids some day.  

Of course, if you can manage not eating them all yourself, these Christmas cookies also make for a thoughtful and inexpensive gift for friends and family. Simply bake the cookies and store in a seasonal tin!

Here is the recipe. Enjoy! 


Step 1: Cream the butter.

Using beaters or a large, wooden spoon, cream the butter until it is silky. 

Step 2: Add ingredients.  

Stir in icing sugar, salt, nutmeg and egg yolk. Keep the egg white for decorating. The mixture should look like this: 


 Step 3: Add flour. 

Add flour to your mixture, a little at a time. Roll dough into a ball and chill for 1 hour.


Step 4: Roll dough.

Roll dough out onto a floured surface using a rolling pin. Use cookie cutters to create holiday shapes!


Step 5: Bake.

Arrage cookies an inch apart on an ungreased cookie sheet. Bake at 350° for seven to ten minutes.

Step 6: Decorate!

Let the cookies cool for ten minutes. Then, decorate your shortbread cookies. Simply brush the cookies with the leftover egg yolk and sprinkle coloured sugar onto them! Store the shortbreads in a pretty holiday tin or freeze them in freezer safe ziplock bags. Share them with friends and family...or eat them all yourself!


Thursday 5 December 2013

DIY Tinsel Wrapped Christmas Trees!


The Christmas tree has long been an icon of the holiday season. Always eager to add a little sparkle to my home décor, I love the idea of emulating the classic Christmas tree shape with some of the beautiful and twinkly things that I find around the house at this time of year. 

Introducing the most inexpensive DIY holiday project yet: the tinsel wrapped Christmas tree. Make this holiday décor item yourself and add it to mantles, side tables or anywhere else you would like to add some Christmas cheer!

Step 1:


Use some sparkly Christmas decorations that you have around the house!


Step 2: 

Take your cardboard cereal box and fold it into a cone shape (to resemble a tree). Secure the seams with tape. Cut any excess cardboard off of the bottom of the cone so that it stands flat.


Step 3: 

Using a glue gun and some tinsel, wrap the tinsel around the cardboard cone from the bottom to the top. In this case, I ran out of the same colour of tinsel, but I decided that I really liked the two tone effect. You should have what appears to be a fuzzy looking tree. 


Step 4:

To create more of a Christmas tree shape, and mimic the look of a garland, wrap Christmas beads from the base of the tree to the top just as you did the tinsel. Secure with hot glue.


Ta da! A DIY Christmas tree that is inexpensive and rivals the ones you can buy at the mall! To make yours extraordinary, add baubles, ribbon and a star! The possibilities are endless. 

Stay tuned for more DIY projects, home décor and fashion ideas coming your way this blogmas!

Anastasia


Wednesday 4 December 2013

DIY Holiday Wreath


Holiday wreaths are a great way to add a warm and inviting touch to your home. You can purchase a high quality holiday wreath but it will cost you a pretty penny. Keep the pretty and your pennies by making your own wreath at home by following these easy steps!

You Will Need:


Step 1: 

Glue your greenery onto the wreath form. I had greenery from an old wreath that bit the dust. Simply place the greenery onto the form until it looks like the real thing! Don't worry if there are some spots that are less thick than others, those will be covered up in just a moment!


Step 2: 

Add the twinkle lights by wrapping them around the wreath and tying the cords onto the wreath form with wire or dental floss. Make sure that the end of the cord has enough slack so that you can plug your wreath in when you are finished. 

Step 3: 

Add some sparkle! I found some broken Christmas bulbs and some plastic snowflakes lying around my house and hot glued them right into the greenery. For the ornaments, simply pop off the metal hook and closure and add hot glue onto the hole in the bulb. I then added a big, red ribbon bow to the bottom of the wreath. Easy!


Step 4:

Hang your wreath using wire or dental floss. Sit back and enjoy!


Tuesday 3 December 2013

Merry Blogmas!!


Hello everybody!

With the holiday season upon us, I thought that I would hop on the Blogmas and Vlogmas bandwagon and get crafting! 

For those of you who are not familiar with Blog/Vlogmas, it just happens to be the most exciting time of the year. For each day leading up to January 1st, I will be sharing a holiday themed DIY here on my blog and on my vlog that is easy, inexpensive and "trés haute"! 

I hope you will follow along with me as I add some holiday cheer to our home this year! And remember, if you try any of these DIY projects, feel free to share your results by tagging your pictures and posts with #hauteblogmas!

Happy holidays and merry b/vlogmas!

Anastasia